Wednesday, August 24, 2011
Cub Scouts Fundraiser Car Wash
N just got into cub scouts and we had our first activity with the group Saturday. It was a fundraiser car wash to help pay for the kids belt loops, shirts, etc. They held signs to get customers and had fun washing the cars down when people came. This is our first time ever being in any kind of scouts so this is all new stuff for us. I'll be posting more about our scouting adventures as they happen!
Tuesday, August 23, 2011
Dr. Seuss One Fish, Two Fish, Red Fish, Blue Fish Day
For our first official week of homeschool kindergarten we are doing a week-long unit covering Dr. Seuss. Our first day is based on One Fish, Two Fish, Red Fish, Blue Fish.
One Fish, Two Fish, Red Fish, Blue Fish Activities:
The obvious thing is to read Dr. Seuss' One Fish, Two Fish, Red Fish, Blue Fish book. We read it once and then also a second time where N had to stand up and act out what was going on on each page. That was a lot of fun!
We printed out a free activity sheet on opposites based on the book from Seussville.com to go along with the story.
The night before I cut plain foam sheets into simple fish shapes in various colors. I dumped them in the bathtub and had N go "fishing" with a spoon to catch them all. He had to sort them into containers based on color and afterwards he counted them all by color and determined which colors had the most and least fish.
On our whiteboard I wrote rows of rhyming words from the story with one word that doesn't rhyme per row. I read him the words and had him circle the word that didn't rhyme.
One Fish, Two Fish, Red Fish, Blue Fish Activities:
The obvious thing is to read Dr. Seuss' One Fish, Two Fish, Red Fish, Blue Fish book. We read it once and then also a second time where N had to stand up and act out what was going on on each page. That was a lot of fun!
We printed out a free activity sheet on opposites based on the book from Seussville.com to go along with the story.
The night before I cut plain foam sheets into simple fish shapes in various colors. I dumped them in the bathtub and had N go "fishing" with a spoon to catch them all. He had to sort them into containers based on color and afterwards he counted them all by color and determined which colors had the most and least fish.
On our whiteboard I wrote rows of rhyming words from the story with one word that doesn't rhyme per row. I read him the words and had him circle the word that didn't rhyme.
He made a Wump out of play-doh. The Wump in the story has 7 humps, his only had 6 but he didn't mind!
And lastly he made his own art page based on the cover of the book:
Monday, August 22, 2011
Our Workbox Set Up Using Recycled Boxes
I got to set up workboxes for our homeschool just in time for the start of our kindergarten year. I didn't have any plastic boxes and husband doesn't want me spending any more money for a while (I've been on quite the shopping the past month getting ready for school!) so I used old shipping boxes I've been saving. They really came in handy!
I didn't want ugly boxes though so we decoupaged/glued magazine and old calendar pictures to the outside of three of them. I used a whole thing of stick glue and the mod podge was making the papers bubbly so I decided to just tape on construction paper to the remaining boxes.
I added a pocket to the front of each box by taping a small piece of construction paper on three sides that is just big enough for our cards to fit in. Instead of using numbered 1-12 cards I used 12 cards with a famous person from history on them. This gives the boxes a small added educational value.
To make the cards I used unlined index cards cut in half and glued a small picture of our famous people onto each card. The people I chose are: George Washington, Cleopatra, Mahatma Gandhi, Leonardo Da Vinci, Anne Frank, Sitting Bull, Dante Alighieri, Albert Einstein, Moses, Hokusai, Confucius, and Martin Luther King Jr. I may add a few quick facts to the backs of them later.
When N is done with a box he moves the card over to a pocket chart I made in a similar way using a piece of cardstock as the background and construction paper pockets taped on. When all the people are on the chart our homeschooling for the day is finished.
I would like to cut the top flaps off of each box to make them go on and off the shelves easier, so that is something I still need to do. I may also label each of the pockets on the chart with the location of the homeland of each famous person so when N is done he has to put them each back in their "home".
I didn't want ugly boxes though so we decoupaged/glued magazine and old calendar pictures to the outside of three of them. I used a whole thing of stick glue and the mod podge was making the papers bubbly so I decided to just tape on construction paper to the remaining boxes.
I added a pocket to the front of each box by taping a small piece of construction paper on three sides that is just big enough for our cards to fit in. Instead of using numbered 1-12 cards I used 12 cards with a famous person from history on them. This gives the boxes a small added educational value.
To make the cards I used unlined index cards cut in half and glued a small picture of our famous people onto each card. The people I chose are: George Washington, Cleopatra, Mahatma Gandhi, Leonardo Da Vinci, Anne Frank, Sitting Bull, Dante Alighieri, Albert Einstein, Moses, Hokusai, Confucius, and Martin Luther King Jr. I may add a few quick facts to the backs of them later.
When N is done with a box he moves the card over to a pocket chart I made in a similar way using a piece of cardstock as the background and construction paper pockets taped on. When all the people are on the chart our homeschooling for the day is finished.
I would like to cut the top flaps off of each box to make them go on and off the shelves easier, so that is something I still need to do. I may also label each of the pockets on the chart with the location of the homeland of each famous person so when N is done he has to put them each back in their "home".
Sunday, August 21, 2011
Pictures Of Our Japan Lapbook
We completed our first lapbook in homeschool. It was all about Japan as that was what we were learning about in our unit study. Most of the info was put together by me on the computer and printed since kiddo wouldn't be able to write everything out yet but he glued it all together. I don't think lapbooking is for us because he isn't the biggest fan of cutting and pasting so we are going to look into other means of recording what we're learning about (for now we're dabbling with notebooking tailoring it to the way he likes to do things). Here are pics of the completed lapbook.
The cover of the lapbook has a maneki neko cat welcoming you to the book along with the flag of Japan.
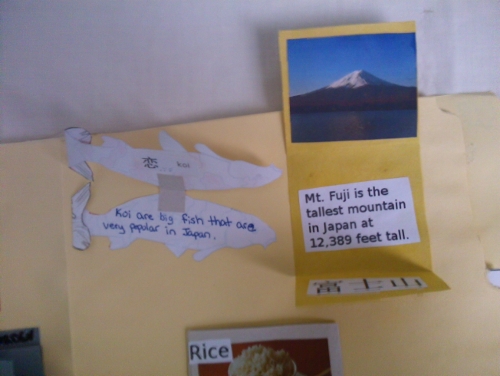
We glued two file folders together so we'd have a bigger lapbook. This is pages one and two when you open the book. The first page has mini books on the history of Japan, art of Japan, government of Japan and samurais. Page two has a mini book on koi fish, Mt. Fuji, rice, Shinto religion, and sushi.
Page three has a kanji word flip-flap book and color squares with the Japanese pronunciation. Page four has a circle book of Japanese technology, sumo wrestling, major festivals of Japan, Japanese pop culture, and inside a Japanese house.
For the back cover we glued a map of Japan with pictures from major cities.
This is the Shinto religion pop-up mini book.
Mt. Fuji matchbook mini book and koi fish mini books opened.
History of Japan, Japanese art forms, and government of Japan mini books opened.
Japanese house four corner mini book open.
Thursday, August 11, 2011
Ghostbusters Tomb of Slimer Craft
Here is a fun Ghostbusters craft we recently did. We printed the Slimer paper cubee from Cyberdrone's deviantART page. He was a little too tricky for a six year old to put together so I did most of Slimer but my son had a good time making the tomb and enjoys playing with his Ghostbusters paper toy. You may also want to stuff Slimer with torn up cotton balls or polyfill for added stability if he will be more than a decoration.
For the tomb get a small box. You can cut off one end if you want for a spot to put Slimer in when he's resting. Cut a piece of construction paper the same size as one end of the box but give a little extra room at the top for the arch effect of the headstone. You can then write "Tomb of Slimer" or something similar on it and decorate it to give it an old, weathered look. Glue it on and Slimer is all set!
Wednesday, August 10, 2011
Cotton Ball Tree Art
This is a simple tree art craft for kids to do. The craft itself doesn't take very long but you'll need to dye the cotton balls in advance as they take time for the color to set and to dry.
You will need:
About 20 cotton balls
Green construction paper
Green food coloring
Plastic baggie
Brown crayon or marker
Dye the cotton balls ahead of time by putting them in a small baggie filled with water and a few drops of green food coloring. Let them soak for a while, then remove and let them dry. Draw on branches of tree and glue the dry cotton balls on the branches for a cute tree!
You will need:
About 20 cotton balls
Green construction paper
Green food coloring
Plastic baggie
Brown crayon or marker
Dye the cotton balls ahead of time by putting them in a small baggie filled with water and a few drops of green food coloring. Let them soak for a while, then remove and let them dry. Draw on branches of tree and glue the dry cotton balls on the branches for a cute tree!
Tuesday, August 9, 2011
Pirate Puppets: Captain Pepper's Pet
These pirate puppets go with the book "Captain Pepper's Pet" to be used as a storytelling aid however they can be used with any pirate theme or customized to fit the look of pirate characters from other stories.
They are made simply with a craft stick, small piece of white pipe cleaner attached as arms (wrap the pipe cleaner around the stick and twist to form arms, folding over a small bit at each end as hands, add a dab of glue to secure), and paper cut out and colored following the design of the pirates from the story and glued onto the craft stick over the arms.

They are made simply with a craft stick, small piece of white pipe cleaner attached as arms (wrap the pipe cleaner around the stick and twist to form arms, folding over a small bit at each end as hands, add a dab of glue to secure), and paper cut out and colored following the design of the pirates from the story and glued onto the craft stick over the arms.
Monday, August 8, 2011
Mount Fuji Paper Plate Craft
The Mount Fuji paper plate craft is an easy painting craft for kids to do during a study of Japan or mountains. You could also change the sign and make this most any mountain really.
You will need:
Paper Plate
Black, white, grey and/or green paint
Toothpick
Scrap piece of construction paper
To make the mountain cut a paper plate on one side forming a long bottom end. Paint black, grey or green depending on if yours will be a view at nighttime or daytime and which mountain you have chosen. If your mountain usually has snow at the top be sure to leave a white spot. Add small trees or grass at the bottom. Attach a sign to a toothpick cut in half that says the mountain's name and glue the sign onto the paper plate.
You will need:
Paper Plate
Black, white, grey and/or green paint
Toothpick
Scrap piece of construction paper
To make the mountain cut a paper plate on one side forming a long bottom end. Paint black, grey or green depending on if yours will be a view at nighttime or daytime and which mountain you have chosen. If your mountain usually has snow at the top be sure to leave a white spot. Add small trees or grass at the bottom. Attach a sign to a toothpick cut in half that says the mountain's name and glue the sign onto the paper plate.
Sunday, August 7, 2011
Recycled Cereal Boxes as Stackable Organization Boxes
Our homeschool room bookshelf had become untidy and very disorganized so I came up with a solution that works great and lets you reuse old cereal boxes for a greater good.
They are very simple to make. First, gather some empty cereal boxes of various sizes (note that only very similar sized ones will work with stacking though!). Cut out either the front or back leaving a very small rim around the side and do not cut any of the edges of the box (you'll need to poke a hole in the cover with the scissors to cut the cover off.)
The only other thing you need to do is staple the top opening flap part of the cereal box (which is now a side). You can glue or tape it also, but stapling works the best.
You can also glue/staple on a piece of construction paper to the front side and label it with whatever it is the box will be holding. I knew saving all of those cereal boxes would come in handy some day!
They are very simple to make. First, gather some empty cereal boxes of various sizes (note that only very similar sized ones will work with stacking though!). Cut out either the front or back leaving a very small rim around the side and do not cut any of the edges of the box (you'll need to poke a hole in the cover with the scissors to cut the cover off.)
The only other thing you need to do is staple the top opening flap part of the cereal box (which is now a side). You can glue or tape it also, but stapling works the best.
You can also glue/staple on a piece of construction paper to the front side and label it with whatever it is the box will be holding. I knew saving all of those cereal boxes would come in handy some day!
Saturday, August 6, 2011
Free Portfolio or Notebook Customizable Panda Cover Page
I made this cover page for my son's kindergarten portfolio cover. I wrote his name, grade and year on it but have left the sign blank so you can add your own text which is easily done in an image-editing software (you can download Gimp for free.) Or, you can just write your text directly onto the sign with a permanent marker and it will look just as nice. Made with Inkscape. You can also download the original .svg file from my Open Clipart gallery.
Friday, July 22, 2011
Our New and Improved Kindergarten Homeschool Schedule
Well, our previous Kindergarten schedule didn't quite work out for us during our test phase of it, so we have moved on to a less defined schedule.
I've left out dance/karate practice and haven't scheduled any type of P.E. I figure we do that anyway, there's no need to schedule it then feel bad that we missed that specific type of P.E. for the third day in a row.
I've also left all time frames on our schedules, there are days we only spend 5 minutes doing something and days we spend an hour on it. This helps us to be much more flexible and it is more enjoyable also!
A lesson from "Teach Your Child to Read in 100 Easy Lessons" takes about 20 minutes, and we spend an additional 5 minutes on some other small activity to keep things fresh, with Starfall taking longer since our son enjoys it. Math takes about 15 minutes or so each day. Japanese varies depending on if we simply do 5 minutes of flash kanji flash cards or spend 30 minutes listening to videos online.
We spend anywhere from 30 minutes to 2 hours a day on unit studies, which cover everything from history to art depending on what unit we're learning about at the time. The time spent on units varies greatly depending on what art project is planned.
So in total we spend around 2-4 hours a day doing homeschool for kindergarten. We usually do Language arts, Math, and Japanese then have a break before doing units.
So, here it is:
Monday - Thursday:
Language Arts (one lesson from "Teach Your Child to Read in 100 Easy Lessons", additional activity)
Math (with manipulatives)
Japanese
Unit Studies
Tuesday we also do a few workbook pages from random store-bought workbooks.
Friday is "Fun Friday" where I try to keep everything different as a nice change. We don't do units on Friday. On Friday we do puzzles, board games, beginner computer art class (I'm teaching him the basics of Inkscape), a science experiment, and some kind of regular art project that isn't centered around a unit study. This ranges from playing with play-doh to him cutting and gluing and making something crazy on his own.
*We also read unit books about our unit topic everyday, along with fun reading at night, but I didn't include that in the schedule because I really like the short and simple layout of our new and improved schedule vs. the cluttered look of our old one. I am glad I had time to do a test run of our schedule before we were "officially" homeschooling so i could work out what does and doesn't work for us!
I've left out dance/karate practice and haven't scheduled any type of P.E. I figure we do that anyway, there's no need to schedule it then feel bad that we missed that specific type of P.E. for the third day in a row.
I've also left all time frames on our schedules, there are days we only spend 5 minutes doing something and days we spend an hour on it. This helps us to be much more flexible and it is more enjoyable also!
A lesson from "Teach Your Child to Read in 100 Easy Lessons" takes about 20 minutes, and we spend an additional 5 minutes on some other small activity to keep things fresh, with Starfall taking longer since our son enjoys it. Math takes about 15 minutes or so each day. Japanese varies depending on if we simply do 5 minutes of flash kanji flash cards or spend 30 minutes listening to videos online.
We spend anywhere from 30 minutes to 2 hours a day on unit studies, which cover everything from history to art depending on what unit we're learning about at the time. The time spent on units varies greatly depending on what art project is planned.
So in total we spend around 2-4 hours a day doing homeschool for kindergarten. We usually do Language arts, Math, and Japanese then have a break before doing units.
So, here it is:
Monday - Thursday:
Language Arts (one lesson from "Teach Your Child to Read in 100 Easy Lessons", additional activity)
Math (with manipulatives)
Japanese
Unit Studies
Tuesday we also do a few workbook pages from random store-bought workbooks.
Friday is "Fun Friday" where I try to keep everything different as a nice change. We don't do units on Friday. On Friday we do puzzles, board games, beginner computer art class (I'm teaching him the basics of Inkscape), a science experiment, and some kind of regular art project that isn't centered around a unit study. This ranges from playing with play-doh to him cutting and gluing and making something crazy on his own.
*We also read unit books about our unit topic everyday, along with fun reading at night, but I didn't include that in the schedule because I really like the short and simple layout of our new and improved schedule vs. the cluttered look of our old one. I am glad I had time to do a test run of our schedule before we were "officially" homeschooling so i could work out what does and doesn't work for us!
Subscribe to:
Posts (Atom)