
Friday, June 17, 2011
Reading Comprehension Questions Cube
Here is a printable reading comprehension cube you can print out, glue together, and use for question/conversation starters with your child about books they've read.


Thursday, January 13, 2011
Homeschool Places to Go in the Tampa/Orlando Area: Glazer Children's Museum
We recently had a chance to go to Glazer Children's Museum located in downtown Tampa, Fl during their first "Free Tuesday by Target" event. We got there 15 minutes and were one of the first people in line. It was a very nice experience and our kids (my son age 5 and his cousins ages 7, 5, and 1) all had a good time. I wrote a review of Glazer Children's Museum. It's a good place homeschooling with a lot opportunities to learn while there or to supplement a topic being learned at home (especially how water works or the weather).


Tuesday, January 11, 2011
Pictures of Our Homeschool Room for Our Kindergartener
We have an extra room in our house that we have set up as our homeschool area. Although we do homeschool stuff all throughout the house, this is where we do our crafts, activities, projects, etc. It has all of our stuff stored neatly (most of the time, anyway).

This is our calendar I bought at Michaels and number banners from the Dollar Store. (I'm a sucker for cute stuff to hang on the wall.)

This is directly below the calendar and numbers. The cardboard is a simple board game we made, the box is holding books we are reading for that unit, and the plastic bins hold a lot of stuff I couldn't find another place for.

Our bookshelf is stuffed full with everything except books (we keep those on our larger bookshelf in the living room). We have flash cards, papers, and a few other odds and ends on the top shelf. The middle shelf holds most our supplies which our being held in glass/plastic jars we recycled by taping paper on them that we decorated. The lego container holds all of our scrap papers in a tidy spot. The bottom shelf is our puzzles.

This is our word tree we are using for learning Japanese kanji. Each week we add a leaf with a new kanji on it and "grow" our tree. This picture was taken right after we set up the tree, before we had added any leaves. This is the tree we bought, it was $12. Below is the first leaf we put on the tree. The kanji is "nani" which means "what".


One of our son's holiday presents was a 6 foot tall standing Abraham Lincoln poster. It greets us right as we walk into the homeschool room. Our first homeschool unit was a unit on America and ever since Abraham Lincoln has been one of his favorite topics to learn about so this was a nice surprise for him.

This is a view of the back wall of our homeschool room. It has an art desk that is hardly ever used (it mostly just holds stuff we have already done, as you can see). We usually sit at our long coffee table to do crafts or anything else because it's larger and has much more working room. You can also catch a glimpse of my recliner that I sit in while he's busy doing crafts or other things that don't need my assistance. The ABC poster was bought at the Dollar Store.

This is the view from the doorway of our homeschool room. Lincoln's poster is to the left just as you walk in, and the coffee table is what we use as our main work space.
I hope you enjoyed looking through our homeschool room!
Chapter Book We're Reading Now: Zombiekins
We have been reading Zombiekins, a fun chapter book about a "stuffy" that comes to life and starts turning the town into zombies. While some may find that as an undesirable topic, we are having great fun reading a few chapters each night! If you're interested in a different type of literature or for a reluctant reader, check out this Zombiekins book review.


Monday, January 10, 2011
Our Kindergarten Homeschool Schedule
Almost everyone who homeschools has a schedule they do that is their own. While everyone does things differently, I've written down our homeschool schedule so other people can look at it and make a schedule of their own. I reviewed a lot of other people's styles before I came up with a schedule that worked for us.
This is our general daily homeschool schedule for our five year old kindergartener. We do units and I plan them out using the internet, library and creativeness. I view this more as daily goals, sometimes stuff comes up and we just don't have time for something and we will just do it another day. Or on some days we don't feel doing karate/dance/ practice so we don't. I'll go into better detail on what I like to accomplish during each part of our schedule below the list.
This is our general daily homeschool schedule for our five year old kindergartener. We do units and I plan them out using the internet, library and creativeness. I view this more as daily goals, sometimes stuff comes up and we just don't have time for something and we will just do it another day. Or on some days we don't feel doing karate/dance/ practice so we don't. I'll go into better detail on what I like to accomplish during each part of our schedule below the list.
Practice writing name and go over calendar - 5 minutes
Extra fun/learning activity - 5-30 minutes depending on the activity
Karate practice - 5 minutes
Dance practice - 5 minutesExtra fun/learning activity - 5-30 minutes depending on the activity
Karate practice - 5 minutes
Gymnastics Practice - 5 minutes
Creative Art Time - 5-30 minutes
Letter writing practice - 5 minutesCreative Art Time - 5-30 minutes
Letter sounds practice - 5 minutes
Number Practice - 5 minutes
Japanese practice - 5-10 minutes
Read unit books - 30 minutes
Unit activities - 1 hour
We also read from a chapter book each (ok, most) nights. We choose ones that interest him with pictures throughout. Right now we are reading Zombiekins. We also read a picture book of his choosing each day, sometimes before we start our homeschooling day, sometimes after, and sometimes around bedtime routine time.
The "extra" activity we do is really varied and I try to just do something fun. Sometimes we play with legos, some other manipulative, color, play a board game, put a puzzle together, etc. It depends a lot on our mood and what else we have planned for the day.
Creative art time is a time where he gets to just draw/paint/design with play doh etc. whatever he wants. We don't use coloring pages here, the idea is for him to use his imagination and gain some early art skills. I don't tell him what to draw but he sometimes asks for suggestions, so I'll say something like people or mountains, just to get his mind flowing. Sometimes he just draws on his own time anyways so we skip it during the homeschool part of our day.
We are learning Japanese as a second language. I'm not fluent by any means (I'm learning just as much as he is!), but I really think it's important to know a second in this day and age so we are starting young. We have a giant paper tree on our wall and each week we add a new leaf with a kanji (Japanese character word) to our tree in addition to learning the hirigana and counting 1-10.
Thursday, December 30, 2010
Japanese Kanji Numbers 1-10 Chart
This is a Japanese kanji numbers 1-10 chart with the kanji for each number and the pronunciation for each. Note that four is sometimes read shi but according to wikipedia yon is the preferred modern reading. For help with pronuciation I recommend watching this Youtube Japanese 1-10 video.


Tuesday, December 14, 2010
Homeschool Hanukkah Unit
Here is a unit on Hanukkah that should last eight days as the holiday does. It is good for any age range and we also read alot of books from the library. There is a craft or game each day, and alot of Hanukkah recipes we cooked and ate.
Day 1: During the day we made a toilet paper roll menorah. It was rather easy as all you need is empty toilet paper rolls (although you'll need eight) and one empty paper towel tube (which is also nice that you're recycling), tissue paper and some paints or glitter glue to decorate with. It was an easy project and our son had alot of fun decorating the tubes with paint.

We learned how to properly light the menorah (which we did by placing yellow tissue paper into the tubes), "lit the candles" and said the Hanukkah prayers that are said while lighting the candles. If you don't know how to do that here is an easy to follow guide.
We also read Hanukkah books and I explained that not everyone celebrates the same holidays.
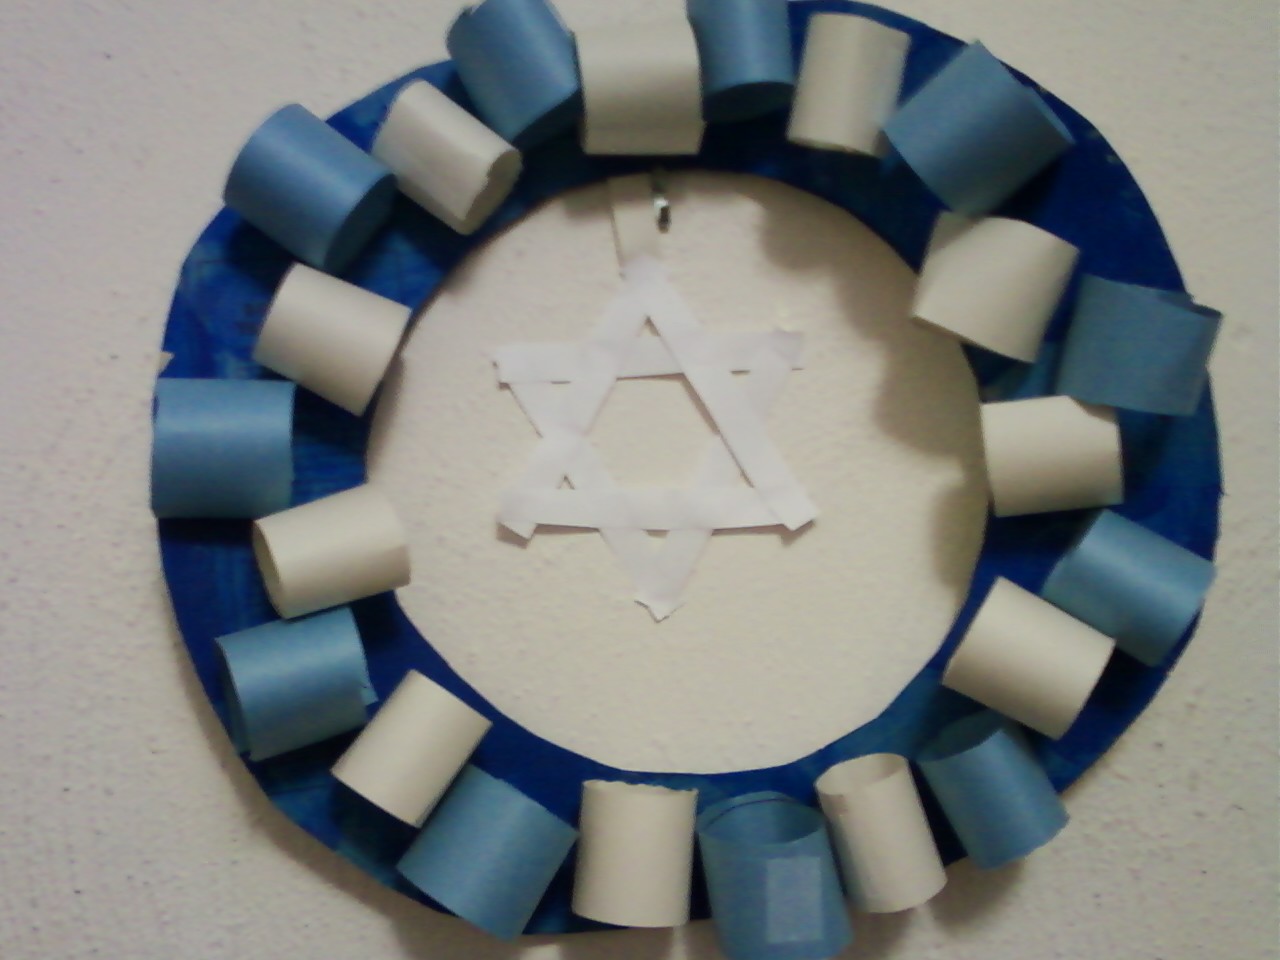
Day 2: Make a Hanukkah wreath. All we used is some cardboard (cereal boxes work well), construction paper and tape or glue. We made blue and white chain links from the paper (but didn't link them!) and instead glued them onto a circle shape cut out of the cereal box. We then made a small Star of David (the symbol on the Israel flag) and attached it to the center of the wreath.
Cook traditional latkes which are a common food during Hanukkah and are easy to make and only take a few ingredients.
Day 3: Make a gelt bag and play dreidel. Gelt is traditionally given out to children during Hanukkah (or won during a game of dreidel) and is usually either coins or chocolate wrapped in candy coin wrappers (we used small tootsie rolls as they are a favorite here).
See How to make a gelt bag and How to play dreidel
Day 4: Make a paper dreidel decoration. We used this outline for ours although we made it out of construction paper, made it bigger and not a pin.
Cook loukoumathes honey puffs, a traditional Jewish snack or dessert. They taste like little donoughts.
Day 5: Make this Ten Commandments craft and cook cottage cheese latkes. We prefered the potato ones but these were easier to cook.
Day 6: To go along with the Ten Commandments craft from the day before make a toilet paper roll Moses craft.
We also cooked another traditional Jewish recipe, kugel. I have never ate kugel before, and it wasn't something I'd ever cook again, but it was interesting to try such a different food than I am used to.
Day 7: Make a Hanukkah crown and cook matzo ball soup. The soup was a hit with my son although he only ate the matzo balls.
Day 8: On day eight bake cupcakes and set them up as a menorah. At nightfall we lit candles on them (all eight this time since it was the last day of Hanukkah), then we were able to eat it! You could just make cupcakes and ice them, or you could decorate with white icing and put a blue Star of David icing design on them as well. Remember you need nine cupcakes for each menorah you make, one Shamash (helper) in the middle (this one should be raised a bit, just set it on top of a small cup or another cupcake) and four on both sides of the Shamash.
We also colored a Hanukkah coloring page.
Wednesday, December 8, 2010
Hanukkah Wreath Craft
Here is an easy, festive Hanukkah wreath craft perfect for children to do.

Materials needed:
Cut a large circle from the cardboard, then carefully cut a smaller circle in the middle of that one. Depending on the size of your box you may need to use both sides of it flattened out to achieve a large enough circle. To achieve a good circle shape you can use anything round that is big enough or freehand the larger outer circle with a pen and trace around a paper plate for the inner circle.
Paint the cardboard circle with blue or white paint and allow to dry.
Cut 1 inch wide strips of the blue and white construction paper then cut the strips in half. Glue or tape them together to form chains (but do not link them together, each piece of chain should be seperate by itself).
Glue each chain onto the cardboard circle alternating the blue and white colors.
Optional: Make a Star of David to hang in the center of your wreath using craft sticks that are painted white. Another option is to make a simpler Star of David out of six strips of white paper cut half an inch wide and 3 1/2 inches long.
Glue the craft sticks or paper in a triangle shape and do the same with the other three. Then flip one triangle upside down and glue it on top of the other one to get the Star of David shape (see picture at top). Attach it to the wreath with a small piece of hanging paper so it hangs in the center of the wreath and hang your wreath on a door or wall for a happy Hanukkah decoration!
- Cardboard (a cereal box works)
- Two sheets each of blue and white construction paper
- Tape
- Glue
- Blue or white paint
- Optional if making a Star of David to hang: 6 craft sticks or one extra sheet of white paper
Cut a large circle from the cardboard, then carefully cut a smaller circle in the middle of that one. Depending on the size of your box you may need to use both sides of it flattened out to achieve a large enough circle. To achieve a good circle shape you can use anything round that is big enough or freehand the larger outer circle with a pen and trace around a paper plate for the inner circle.
Paint the cardboard circle with blue or white paint and allow to dry.
Cut 1 inch wide strips of the blue and white construction paper then cut the strips in half. Glue or tape them together to form chains (but do not link them together, each piece of chain should be seperate by itself).
Glue each chain onto the cardboard circle alternating the blue and white colors.
Optional: Make a Star of David to hang in the center of your wreath using craft sticks that are painted white. Another option is to make a simpler Star of David out of six strips of white paper cut half an inch wide and 3 1/2 inches long.
Glue the craft sticks or paper in a triangle shape and do the same with the other three. Then flip one triangle upside down and glue it on top of the other one to get the Star of David shape (see picture at top). Attach it to the wreath with a small piece of hanging paper so it hangs in the center of the wreath and hang your wreath on a door or wall for a happy Hanukkah decoration!
Wednesday, December 1, 2010
Single Parenting and Homeschooling: Free Curriculum, Printables, and Lesson Sites
Single Parenting and Homeschooling: Free Curriculum, Printables, and Lesson Sites: "Free stuff rules, right? Especially when going at it on a budget and having to invest some dollars in curriculum supplies has kicked us in t..."
Sunday, November 28, 2010
Socializing the Single Child Homeschooler
Socialization will always come up when you homeschool, whether you have five kids or one, whether it's a comment from Grandma, the store clerk, or those unsure voices in your head (am I doing enough??). The problems can really arise when you're homeschooling an only child though. It's true they don't have the benefit of a sibling that is always around, whether they're playing nicely or arguing.
Being a homeschool mother of an only child I'm often faced with doubts and wonders in my own mind if I am doing enough for our son. He goes to karate practice once a week, has three wonderful public school cousins he plays with weekly and goes on outings with, and he has a good neighborhood public school friend he plays with almost every day for a few hours after she gets out of school. But is that enough? Public school kids are around other kids for 40 hours a week! We don't come close to matching that... and that is perfectly fine with us!
Although I have to admit, it took me a long time to come to terms with that. It is daunting to think of how much time public school kids are around other kids. But is it all roses? Probably not. In between being quiet in the hall (and sometimes at lunch), being even more quiet in class (how many public school kids come home with a "bad color" each day because they were talking in class?), bullies, to shorter and shorter recess times, and to being exposed to kids who are only within their specific age range (no where else in life will large groups of people be segregated based solely on age).
Most kids, no matter where they go to school, usually have "best friends" that they met somewhere outside of school anyways. Not even half of my childhood best friends were met at school and none of the ones I met outside of school were ever in the same grade as me, we were always one or two grades apart.
So what can you do to help your homeschooled child get around more kids and make some friends?
To start, it is very easy to replicate recess time in a homeschool enviroment because you are free to go to the park whenever you want. You can go during school hours and probably not run into many kids, but you can also go shortly after school lets out or on the weekends and have plenty of kids for you child to play with. And even better, you don't have to be done in 15 minutes if you don't want to be!
Local libraries often have story reading times (where singing and dancing games are usually incorporated) for free for younger children, tween game nights, teen anime and discussion groups. The events your library holds regularly are probably bountiful even if you don't live in a large city. (Our library is small and does all those mentioned above plus more.)
Extracurricular activities are of course another option (and usually a fun one at that). Karate, dance, gymnastics, boy/girl scouts, the local YMCA, little league, or any other team sport are just some of the great options that are offered in most any city in the U.S. that your child will have great opportunities to meet other children and form relationships (and also to work in a group setting).
Even a trip to close by but low cost places can help your child find friends. A trip to the beach, lake, children's museum (they sometimes have free or very low cost days once in awhile too), or even the local McDonald's play area all are opportunities to interact with other kids and possibly make a new friend.
So even if you don't have many cousins for your child, neighborhood kids around, money (remember the libraries events will be free and the YMCA has a low cost option for families that need it), or a local homeschool group, there are alot of opportunities for socializing your homeschooled child.
But the bottom line is, is your child happy? Even with everything my son was doing I was paranoid it wasn't enough. But I realized a couple weeks ago to just relax when I was worried and blurted out my thoughts: "He (my son) doesn't have enough friends". Well, let me tell you, he heard me and replied in an insulted kind of way: "Yes I do have friends!" and proudly proceeded to name off all of his cousins, his uncles and aunts, mom and dad, his neighborhood friend (who is three years older and a girl), and the kids at karate that he hasn't even played with outside of karate. He thinks he has alot of friends and he's perfectly content just the way it is. And he's an only child homeschooler.
Subscribe to:
Posts (Atom)